分类目录归档:react-native

react-native仿微信通讯录右侧边栏快速定位功能

代码地址 -> ReactNativeCountrySelect
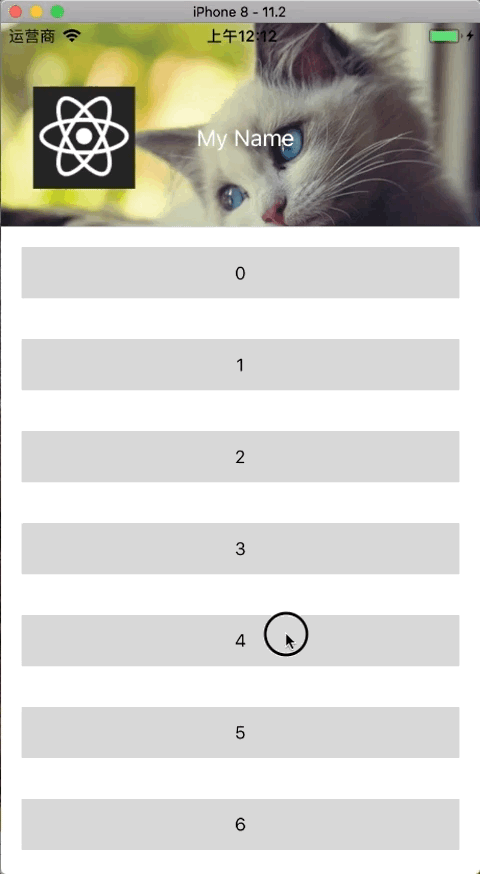
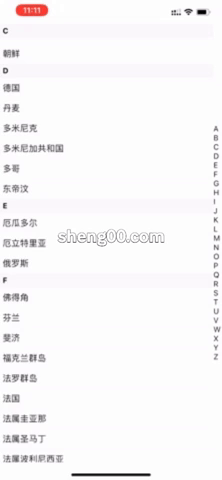
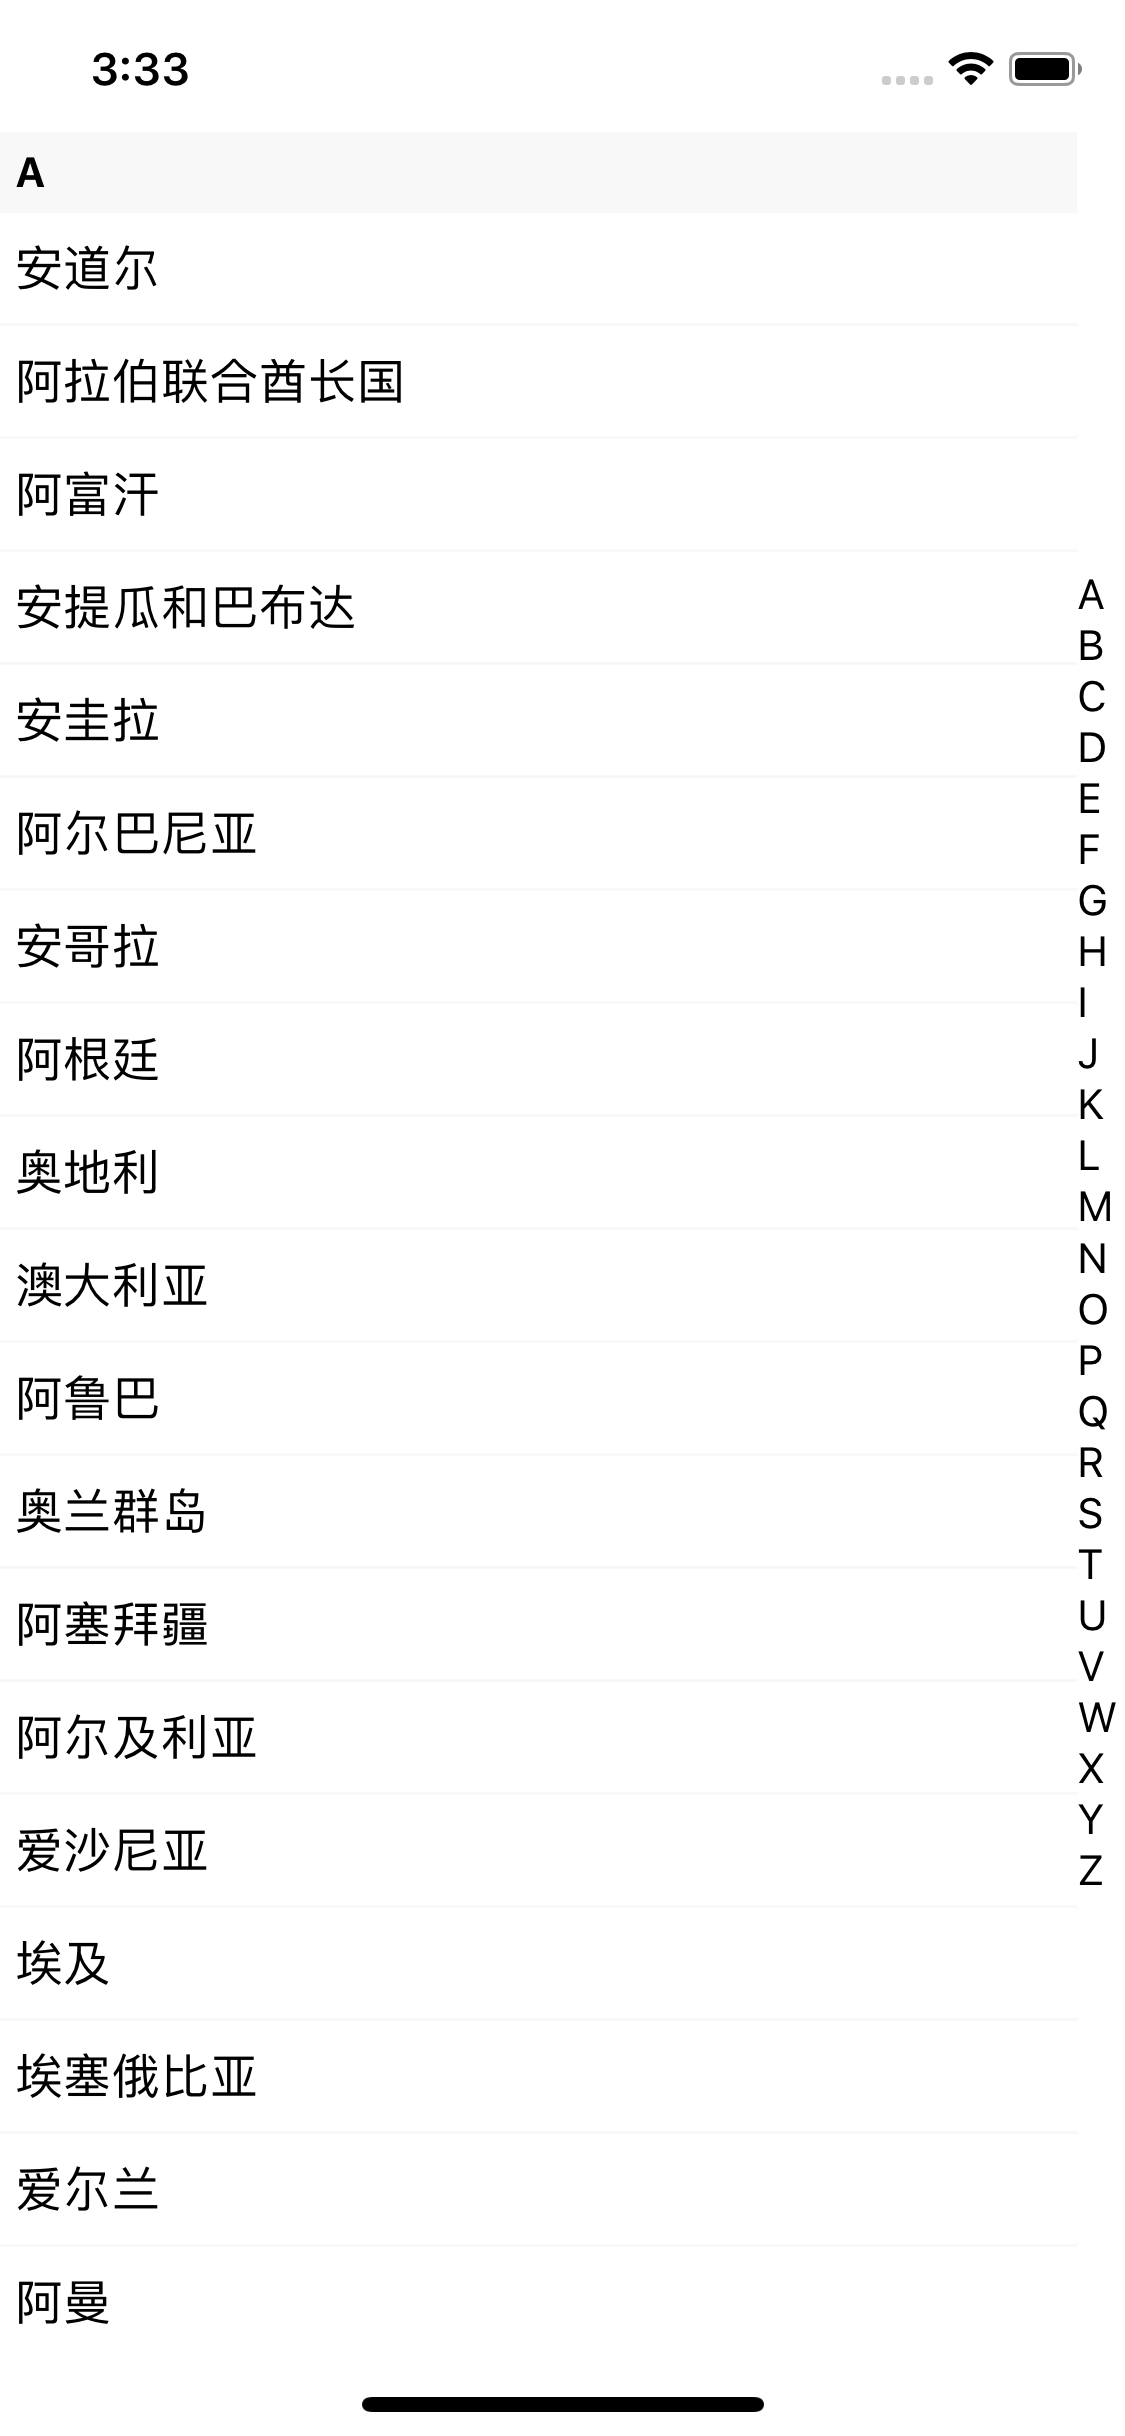
1. 界面

SectionList把数据渲染出来

右边的A-ZText组件即可,这里为了做滑动定位,没有选择Touchable组件

import * as React from 'react';
import {
  Text,
  View,
  StyleSheet,
  SectionList,
  SafeAreaView,
} from 'react-native';

import countries from './countryCode.json';
const sectionMapArr = [
  ['A', 0],
  ['B', 1],
  ['C', 2],
  ['D', 3],
  ['E', 4],
  ['F', 5],
  ['G', 6],
  ['H', 7],
  ['I', 8],
  ['J', 9],
  ['K', 10],
  ['L', 11],
  ['M', 12],
  ['N', 13],
  ['O', 14],
  ['P', 15],
  ['Q', 16],
  ['R', 17],
  ['S', 18],
  ['T', 19],
  ['U', 20],
  ['V', 21],
  ['W', 22],
  ['X', 23],
  ['Y', 24],
  ['Z', 25],
];
export default class App extends React.Component {
  render() {
    return (
      <SafeAreaView style={styles.container}>
        <SectionList
          containerStyle={{ flex: 1, justifyContent: 'center' }}
          ItemSeparatorComponent={() => (<View style={{ borderBottomColor: '#F8F8F8', borderBottomWidth: 1, }} />)}
          renderItem={({ item, index, section }) => (
            <View style={styles.itemContainer}>
              <Text style={styles.itemText} key={index}>
                {item.countryName}
              </Text>
            </View>
          )}
          renderSectionHeader={({ section: { key } }) => (
            <View style={styles.headerContainer}>
              <Text style={styles.headerText}>{key}</Text>
            </View>
          )}
          sections={countries}
          keyExtractor={(item, index) => item + index}
        />
        <View
          style={{ width: 16, justifyContent: 'center' }}
        >
          {sectionMapArr.map((item, index) => {
            return (
              <Text
                key={index}
              >
                {item[0]}
              </Text>
            );
          })}
        </View>
      </SafeAreaView>
    );
  }
}

const styles = StyleSheet.create({
  container: {
    flex: 1,
    backgroundColor: '#FFFFFF',
    flexDirection: 'row',
  },
  headerContainer: {
    padding: 5,
    backgroundColor: '#F8F8F8',
  },
  headerText: {
    fontWeight: 'bold',
  },
  itemContainer: {
    paddingHorizontal: 5,
    paddingVertical: 10,
  },
  itemText: {
    fontSize: 16,
  },
});

这时候界面已经完成了,然后就是增加触摸滑动定位的功能了。

2. 使用Gesture Responder System监听触摸事件

给右侧的View上启用手势


<View style={{ width: 16, justifyContent: 'center' }} onStartShouldSetResponder={() => true} onMoveShouldSetResponder={() => true} > {sectionMapArr.map((item, index) => { return ( <Text key={index} > {item[0]} </Text> ); })} </View>

这样我们就可以在触摸滑动的时候,获得滑动到的位置

3. 使用onLayout找到每个字母对应的X、Y

首先在constructor里声明一个实例属性,用来记录每个字母的信息:

this.ps = [];

然后在Text组件上利用onLayout获得每个字母的位置,并且存到this.ps里:

<Text
  key={index}
  onLayout={({
    nativeEvent: {
      layout: { x, y, width, height },
    },
  }) => {
    this.ps = this.ps.filter(i => i.key !== item[0]); 
    this.ps.push({
      key: item[0],     // 对应的字母 A-Z
      min: y,           // 字母顶部Y坐标
      max: y + height,  // 字母底部Y坐标
      index: item[1],   // 字母对应SectionList的index
    });
  }}
>
  {item[0]}
</Text>

4. 根据滑动找到滑到哪个字母上

<View
  style={{ width: 16, justifyContent: 'center' }}
  onStartShouldSetResponder={() => true}
  onMoveShouldSetResponder={() => true}
  onResponderMove={({ nativeEvent: { pageY } }) => {
    const offsetY = pageY - this.offsetY;
    const find = this.ps.find(
      i => i.min < offsetY && i.max > offsetY
    );
    if (find) {
      console.log(find) // 滑动到的字母
    }
  }}
>

5. 根据触摸的字母,SectionList跳到对应的位置

  1. 先在constructor里创建ref
this.sectionlist = React.createRef();
  1. 在SectionList上绑定ref
ref={this.sectionlist}
  1. 调用SectionList的scrollToLocation
onResponderMove={({ nativeEvent: { pageY } }) => {
  const offsetY = pageY - this.offsetY;
  const find = this.ps.find(
    i => i.min < offsetY && i.max > offsetY
  );
  if (find) {
    this.sectionlist.current.scrollToLocation({
      sectionIndex: find.index,
      itemIndex: 0,
      animated: false,
    });
  }
}}

完工

react native改变WebView背景颜色

react-native的WebView背景颜色是无法改变的,不过我们可以用另一个View盖住WebView,达到改变颜色的效果。

import React from 'react';
import {View, StyleSheet, WebView, ActivityIndicator} from 'react-native';

export default class YourComponent extends React.PureComponent{

    state = {
        loading: true,
    };

    render() {
        return (
            <View>
                <WebView
                    source={html}
                    onLoadEnd={() => {
                        this.setState({loading: false});
                    }}
                />
                {
                    this.state.loading && (
                        <View style={{
                            ...StyleSheet.absoluteFillObject,
                            backgroundColor: '#000000',  // your color 
                            alignItems: 'center',
                            justifyContent: 'center',
                        }}>
                            <ActivityIndicator />
                        </View>
                    )
                }
            </View>
        )

    }
}

react-native中使用SafeAreaView保证iPhoneX兼容性

react-native从0.50.1开始,提供了SafeAreaView来确保iPhone X的兼容性,效果如下:

代码如下:

import {
  ...
  SafeAreaView
} from 'react-native';
class Main extends React.Component {
  render() {
    return (
      <SafeAreaView style={styles.safeArea}>
        <App />
      </SafeAreaView>
    )
  }
}
const styles = StyleSheet.create({
  ...,
  safeArea: {
    flex: 1,
    backgroundColor: '#ddd'
  }
})

并且,SafeAreaView会在接打电话等需要调整状态栏高度的时候自动调整状态栏的高度:

react native实现拖拽/拖放

react native实现拖拽/拖放

首先初始化一个react native的项目,cd到你的目录下运行

react-native init rndd

创建一个新的组件./app/components/Draggable.js

import React, {
    Component,
} from 'react';
import {
    StyleSheet,
    Image,
    PanResponder,
    Animated,
} from 'react-native';
class Draggable extends Component{
    constructor(props){
        super(props);
    }
    render(){
        return (
            <Animated.View style={styles.container}>
                <Image style={{width:80,height:80}} source={require('../assets/react-native.jpg')}/>
            </Animated.View>
        )
    }
}
export default Draggable;
const styles = StyleSheet.create({
    container: {
        position: 'absolute',
        left: 100,
        top: 100,
    }
});

加上PanResponder

PanResponder的api可以上官网查看PanResponder

componentWillMount() {
    this._panResponder = PanResponder.create({
        onMoveShouldSetResponderCapture: () => true,
        onMoveShouldSetPanResponderCapture: () => true,
        onPanResponderGrant: (e, gestureState) => {
        },
        onPanResponderMove: Animated.event([
        ]),
        onPanResponderRelease: (e, {vx, vy}) => {
        }
    });
}
render(){
    return (
        <Animated.View style={styles.container} {...this._panResponder.panHandlers}>
            <Image style={{width:80,height:80}} source={require('../assets/react-native.jpg')}/>
        </Animated.View>
    )
}

响应拖拽事件

先在state中创建一个对象来记录拖拽的记录。

constructor(props) {
    super(props);
    this.state = {
        pan: new Animated.ValueXY()
    };
}

更新panHandler:

componentWillMount() {
    this._panResponder = PanResponder.create({
        onMoveShouldSetResponderCapture: () => true,
        onMoveShouldSetPanResponderCapture: () => true,
        // 设置初始位置
        onPanResponderGrant: (e, gestureState) => {
            this.state.pan.setValue({x: 0, y: 0});
        },
        // 使用拖拽的偏移量来定位
        onPanResponderMove: Animated.event([
            null, {dx: this.state.pan.x, dy: this.state.pan.y},
        ]),
        onPanResponderRelease: (e, {vx, vy}) => {
        }
    });
}

更新render方法

render(){
    // 从state中取出pan
    const { pan } = this.state;
    // 从pan里计算出偏移量
    const [translateX, translateY] = [pan.x, pan.y];
    // 设置transform为偏移量
    const imageStyle = {transform: [{translateX}, {translateY}]};
    return (
        <Animated.View style={[styles.container,imageStyle]} {...this._panResponder.panHandlers}>
            <Image style={{width:80,height:80}} source={require('../assets/react-native.jpg')}/>
        </Animated.View>
    )
}

这个时候我们刷新用CMD+R刷新,发现已经可以拖动这个图片了,但是有个问题,第二次拖拽的时候又从原点开始移动,我们接下来解决这个问题。
我们有几个选择:

  1. 让拖动的元素在释放的时候回到原来的位置:
    修改PanResponder的onPanResponderRelease方法

    onPanResponderRelease: (e, {vx, vy}) => {
        Animated.spring(
            this.state.pan,
            {toValue: {x: 0, y: 0}}
        ).start();
    }
    
  2. 让拖动的元素停留在拖拽到的位置:
    修改PanResponder的onPanResponderGrant和onPanResponderRelease方法

    this._panResponder = PanResponder.create({
        onMoveShouldSetResponderCapture: () => true,
        onMoveShouldSetPanResponderCapture: () => true,
        // 设置初始位置
        onPanResponderGrant: (e, gestureState) => {
            this.state.pan.setOffset({
                x: this.state.pan.x._value,
                y: this.state.pan.y._value
            });
            this.state.pan.setValue({x: 0, y: 0});
        },
        // 使用拖拽的偏移量来定位
        onPanResponderMove: Animated.event([
            null, {dx: this.state.pan.x, dy: this.state.pan.y},
        ]),
        onPanResponderRelease: (e, {vx, vy}) => {
            this.state.pan.flattenOffset();
        }
    });
    

我们再来加上拖拽时候放大的效果

先在state里加上一个scale用来记录放大的倍数

this.state = {
    pan: new Animated.ValueXY(),
    scale: new Animated.Value(1)
};

我们要在render里使用放大的值

render(){
    // 从state中取出pan和scale
    const { pan, scale } = this.state;
    // 从pan里计算出偏移量
    const [translateX, translateY] = [pan.x, pan.y];
    // 设置transform为偏移量
    const imageStyle = {transform: [{translateX}, {translateY},  {scale}]};
    return (
        <Animated.View style={[styles.container,imageStyle]} {...this._panResponder.panHandlers}>
            <Image style={{width:80,height:80}} source={require('../assets/react-native.jpg')}/>
        </Animated.View>
    )
}

在拖拽的时候变大:

onPanResponderGrant: (e, gestureState) => {
    this.state.pan.setOffset({
        x: this.state.pan.x._value,
        y: this.state.pan.y._value
    });
    this.state.pan.setValue({x: 0, y: 0});
    Animated.spring(
        this.state.scale,
        { toValue: 1.3, friction: 3 }
    ).start();
},

在释放的时候缩小到原来的样子:

onPanResponderRelease: (e, {vx, vy}) => {
    this.state.pan.flattenOffset();
    Animated.spring(
        this.state.scale,
        { toValue: 1, friction: 3 }
    ).start();
}

加上拖拽的旋转效果:

先在state中加上一个rotate用来记录旋转的角度

this.state = {
    pan: new Animated.ValueXY(),
    scale: new Animated.Value(1),
    rotate: new Animated.Value(0)
};

在拖拽的时候旋转,需要在onPanResponderGrant里加上

Animated.timing(this.state.rotate, {
    toValue: 25, // 旋转25%,render里interpolate出deg的值
    duration: 300
}).start();

在释放的时候恢复原状,需要在onPanResponderRelease中加上

Animated.timing(this.state.rotate, {
    toValue: 0,
    duration: 300
}).start();

render函数里设置transform:

render(){
    // 从state中取出pan
    const { pan, scale } = this.state;
    // 从pan里计算出偏移量
    const [translateX, translateY] = [pan.x, pan.y];
    // 计算旋转
    const rotate = this.state.rotate.interpolate({
        inputRange: [0, 100],
        outputRange: ['0deg', '360deg']
    });
    // 设置transform为偏移量
    const imageStyle = {transform: [{translateX}, {translateY},  {scale}, {rotate}]};
    return (
        <Animated.View style={[styles.container,imageStyle]} {...this._panResponder.panHandlers}>
            <Image style={{width:80,height:80}} source={require('../assets/react-native.jpg')}/>
        </Animated.View>
    )
}

完整代码:

https://github.com/shengoo/rndd

import React, {
    Component,
} from 'react';
import {
    StyleSheet,
    Image,
    PanResponder,
    Animated,
} from 'react-native';
class Draggable extends Component{
    constructor(props){
        super(props);
        this.state = {
            pan: new Animated.ValueXY(),
            scale: new Animated.Value(1),
            rotate: new Animated.Value(0)
        };
    }
    componentWillMount() {
        this._panResponder = PanResponder.create({
            onMoveShouldSetResponderCapture: () => true,
            onMoveShouldSetPanResponderCapture: () => true,
            // 设置初始位置
            onPanResponderGrant: (e, gestureState) => {
                this.state.pan.setOffset({
                    x: this.state.pan.x._value,
                    y: this.state.pan.y._value
                });
                this.state.pan.setValue({x: 0, y: 0});
                Animated.spring(this.state.scale, {
                    toValue: 1.3,
                    friction: 3 }
                ).start();
                Animated.timing(this.state.rotate, {
                    toValue: 25,
                    duration: 300
                }).start();
            },
            // 使用拖拽的偏移量来定位
            onPanResponderMove: Animated.event([
                null, {dx: this.state.pan.x, dy: this.state.pan.y},
            ]),
            onPanResponderRelease: (e, {vx, vy}) => {
                this.state.pan.flattenOffset();
                // Animated.spring(
                //     this.state.pan,
                //     {toValue: {x: 0, y: 0}}
                // ).start();
                Animated.spring(
                    this.state.scale,
                    { toValue: 1, friction: 3 }
                ).start();
                Animated.timing(this.state.rotate, {
                    toValue: 0,
                    duration: 300
                }).start();
            }
        });
    }
    render(){
        // 从state中取出pan
        const { pan, scale } = this.state;
        // 从pan里计算出偏移量
        const [translateX, translateY] = [pan.x, pan.y];
        // 计算旋转
        const rotate = this.state.rotate.interpolate({
            inputRange: [0, 100],
            outputRange: ['0deg', '360deg']
        });
        // 设置transform为偏移量
        const imageStyle = {transform: [{translateX}, {translateY},  {scale}, {rotate}]};
        return (
            <Animated.View style={[styles.container,imageStyle]} {...this._panResponder.panHandlers}>
                <Image style={{width:80,height:80}} source={require('../assets/react-native.jpg')}/>
            </Animated.View>
        )
    }
}
export default Draggable;
const styles = StyleSheet.create({
    container: {
        position: 'absolute',
        left: 100,
        top: 100,
    }
});

iOS原生app中集成react-native组件

在iOS原生app中增加ReactNative

  1. 新建一个iOS的项目,打开XCode,新建一个项目,选择Tabbed App

  2. 运行一下看看效果

  3. 新建一个react-native项目,和iOS的项目中同一个目录下

    brew install node
    brew install watchman
    npm install -g react-native-cli
    react-native init ReactNativeProject
    
  4. 启动react-native服务器
    react-native start
    
  5. 安装CocoaPods
    brew install cocoapods
    
  6. 初始化CocoaPods,在你的iOS项目根目录里运行
    pod init
    
  7. 编辑生成的Podfile,增加react-native的pod
    # Uncomment the next line to define a global platform for your project
    # platform :ios, '9.0'
    target 'demo' do
    # Comment the next line if you're not using Swift and don't want to use dynamic frameworks
    use_frameworks!
    # Pods for demo
    pod 'React', :path => ‘../ReactNativeProject/node_modules/react-native', :subspecs => [
    'Core',
    'CxxBridge', # Include this for RN >= 0.47
    'DevSupport', # Include this to enable In-App Devmenu if RN >= 0.43
    'RCTText',
    'RCTNetwork',
    'RCTWebSocket', # needed for debugging
    # Add any other subspecs you want to use in your project
    ]
    pod "yoga", :path => "../ReactNativeProject/node_modules/react-native/ReactCommon/yoga"
    pod 'DoubleConversion', :podspec => '../ReactNativeProject/node_modules/react-native/third-party-podspecs/DoubleConversion.podspec'
    pod 'GLog', :podspec => '../ReactNativeProject/node_modules/react-native/third-party-podspecs/GLog.podspec'
    pod 'Folly', :podspec => '../ReactNativeProject/node_modules/react-native/third-party-podspecs/Folly.podspec'
    target 'demoTests' do
    inherit! :search_paths
    # Pods for testing
    end
    target 'demoUITests' do
    inherit! :search_paths
    # Pods for testing
    end
    end
    
  8. 运行pod install安装依赖,得到以下输出:
    $ pod install
    Setting up CocoaPods master repo
    $ /usr/bin/git clone https://github.com/CocoaPods/Specs.git master --progress
    Cloning into 'master'...
    remote: Counting objects: 1799117, done.
    remote: Compressing objects: 100% (377/377), done.
    remote: Total 1799117 (delta 157), reused 35 (delta 35), pack-reused 1798692
    Receiving objects: 100% (1799117/1799117), 500.73 MiB | 320.00 KiB/s, done.
    Resolving deltas: 100% (981561/981561), done.
    Checking out files: 100% (203691/203691), done.
    Setup completed
    Analyzing dependencies
    Fetching podspec for `DoubleConversion` from `../ReactNativeProject/node_modules/react-native/third-party-podspecs/DoubleConversion.podspec`
    Fetching podspec for `Folly` from `../ReactNativeProject/node_modules/react-native/third-party-podspecs/Folly.podspec`
    Fetching podspec for `GLog` from `../ReactNativeProject/node_modules/react-native/third-party-podspecs/GLog.podspec`
    Fetching podspec for `React` from `../ReactNativeProject/node_modules/react-native`
    Fetching podspec for `yoga` from `../ReactNativeProject/node_modules/react-native/ReactCommon/yoga`
    Downloading dependencies
    Installing DoubleConversion (1.1.5)
    Installing Folly (2016.09.26.00)
    Installing GLog (0.3.4)
    Installing React (0.51.0)
    Installing boost (1.59.0)
    Installing yoga (0.51.0.React)
    Generating Pods project
    Integrating client project
    
  9. 打开iOS项目目录下的demo.xcworkspace

  10. 在AppDelegate.swift文件中引入React

    import React
    
  11. 声明react-native组件的UIViewController并加入到tab中
    func application(_ application: UIApplication, didFinishLaunchingWithOptions launchOptions: [UIApplicationLaunchOptionsKey: Any]?) -&gt; Bool {
    // Override point for customization after application launch.
    var tab = self.window?.rootViewController as! UITabBarController
    let jsCodeLocation = URL(string: "http://localhost:8081/index.bundle?platform=ios")
    let rootView = RCTRootView(
    bundleURL: jsCodeLocation,
    moduleName: "ReactNativeProject",
    initialProperties: nil,
    launchOptions: nil
    )
    let vc = UIViewController()
    vc.view = rootView
    vc.title = "rn"
    tabbar.viewControllers?.append(vc)
    return true
    }
    
  12. 设置允许localhost的http访问

  13. 运行看看效果

代码: https://github.com/shengoo/iOS-rn-h5